Create KPI Key Result
HUB
OKR
- Create OKR
- OKR without KR
- Create Milestone Key Result
- Create Sobject Key Result
- Sample Sobject
- Sample KPI Filters
- Create Split Target for Key Results
- Create Linked OKR Key Result
- Create Link KR Key Result
- Team Access Only OKRs
- Private OKRs
- Strategic Pillar
- Create KPI Key Result
- Create Report Key Result
- Edit/View OKR
- Add Contributors for Key Results
- Clone OKR
- Clone Key Result
- Close OKR & Add Review Score
- Pause and Unpause OKR
- Save OKR as a Template
- OKR Weights
- Links to OKRs
Board with OKRs
Create OKR from Template
Update Key Result
Hierarchy & Heatmap
KPI
Scorecard
Contest
Recognition
Boards
Funnel
Others
- OKR Reports
- OKRify Dashboards
- Create Teams and Team Members
- Create Periods
- Settings
- Setup Email Notification
- Update Email Template – Key Result Overdue Notifications
- Create New Salesforce Report
- Create new Salesforce Dashboard
- How to search for Tags
- View risk and progress for Objectives and Key Results
- Notifications for Overdue Key Results
- OKR Buttons for Related Objects
- Add an Object as a custom field on OKR
KPI Key Result can be used to track Key Progress using KPIs created in OKRify. KPIs can be created in OKRify using any Salesforce object to track important metrics. Some of the most commonly tracked metrics using KPIs are Open Opportunities, Closed Opportunity Total, Number of Calls, Events, Lead Qualification Ration, etc. We strongly recommend creating KPIs for important metrics that will be used in OKRs, KPI Key results will save time in creating OKRs and updating progress as progress will be accurately and automatically updated based on Salesforce data.
KPI Key Result’s progress is automatically updated based on the value from the KPIs. Irrespective of the timeframe in KPIs, KPI key result uses dates from OKR period and Key Result deadline to calculate the progress of the KPI key result. For example, if the KPI timeframe is Monthly and OKR is for quarterly, OKRify will automatically use the quarterly period in OKR to calculate the progress for the Key Result.
Key Result based on KPIs
To create a KPI Key Result, follow the steps provided in create OKR to enter objective fields and for the Key Result follow the below steps

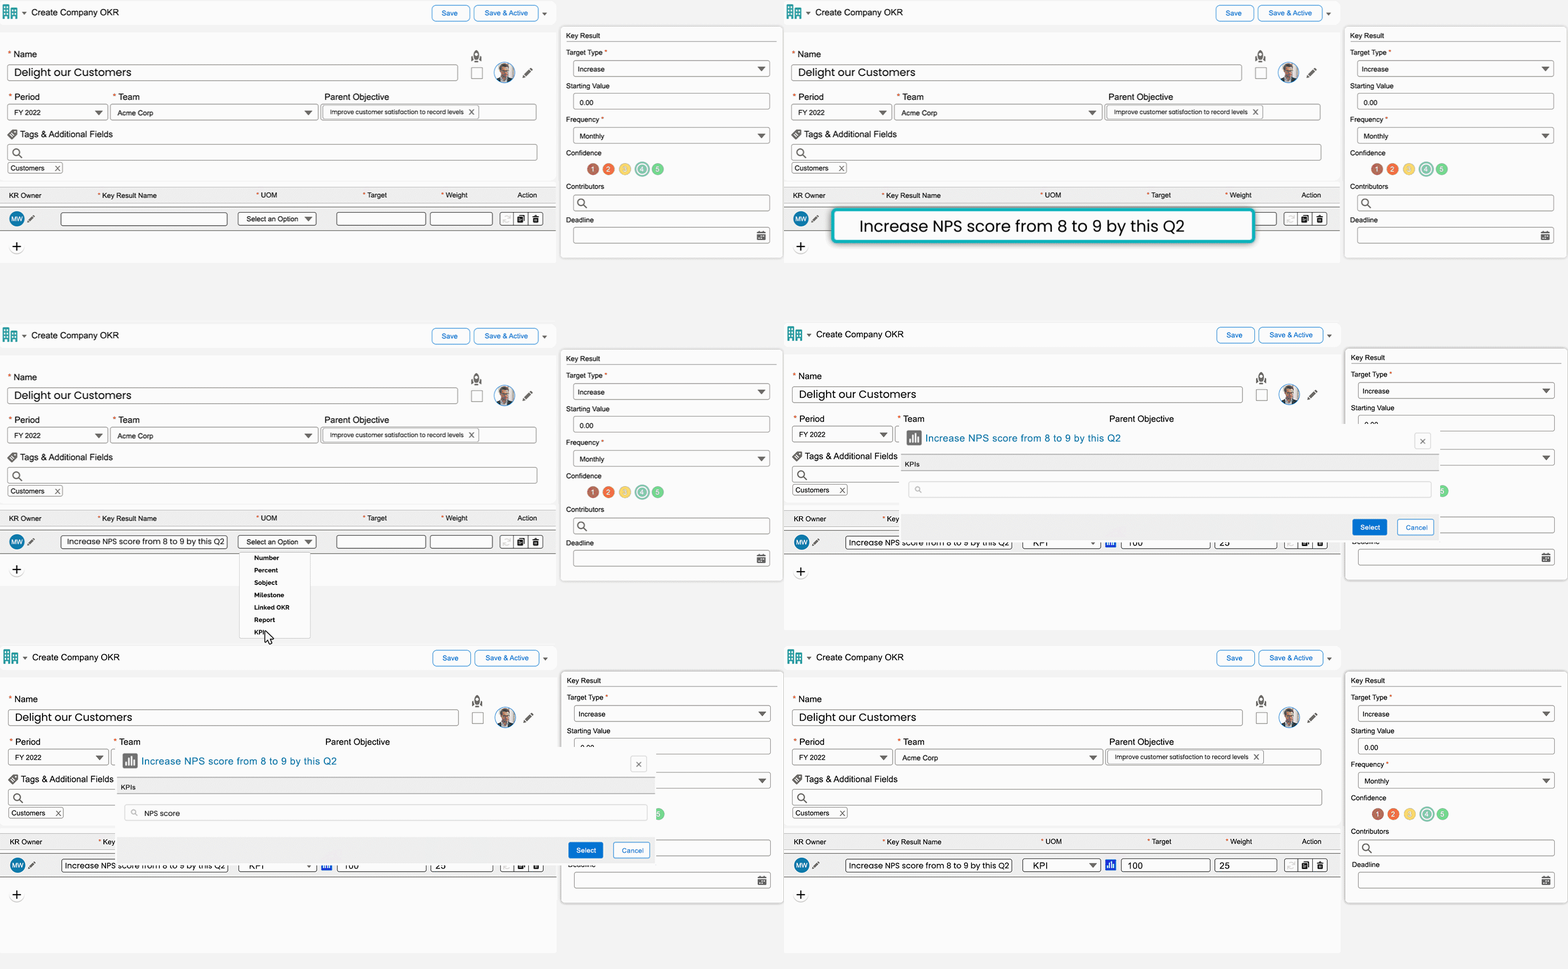
1.Enter Key Result Name
Key Result names should be short, concise, and highly recommended to include measurable values. The icon next to the Key Result Name field will be red if the Key Result name field does not have a numeric value. This is not an error, it is to help the users to ensure Key Results names are measurable.
2.Enter Unit as KPI ![]()
Select KPI in the Unit dropdown. The frequency will be automatically set to Daily.
3.Enter KPI Information
Click KPI icon next to the KPI Unit field to open the KPI selection screen,
- Search for a KPI
- Select a KPI
- Click Save to return to the main OKR screen.
4.Enter Target
Enter target for Key Result. Target should be greater than the starting value for the Increase Key Result type and Target should be lesser than the starting value for the Decrease Key Result type.
5.Enter Weight
Enter the weight for the Key Result to calculate the progress for the Objective.
Enter the below optional fields for each key results in the side window
6.Enter Split Target (Optional)
a.Click Split Target Icon
Click the Split Target icon to open the Split Target screen. Once a split target is entered then the Target type is set up Increase and the Starting value field is disabled. Deadline date field will also be disabled once the Split Target values are entered, deadline date has to be entered before entering the Split Target values.
b.Select a Split Period
Select a Split Period such as Month or Week
C. Enter targets for Split intervals
Enter targets for each split time interval, total KR target should be equal to the sum of the targets entered for the time intervals. Click Save to return to the main OKR screen.
7.Select Target Type
The default value is Increase, select Decrease if the expected target should be lower than the starting value.
8.Enter Starting Value
The starting value is optional for Increase Target type Key Result and it should be lower than the target. In the case of Decrease Target type Key Result, starting value is required and should be higher than the target.
9.Select Confidence
Select the initial confidence for achieving the key result’s target.
10.Enter Contributors (Optional)
Enter any additional user/users as contributors for the Key Result. Contributors can also update the Key Result’s progress along with the Owner of the Key Result.
11.Enter Deadline (Optional)
Enter a custom deadline for the Key Result if it is different from the end date for the period selected for the OKR. The deadline date should be between the start and end dates of the period selected.
Add more Key Results and Save or Save & Activate the OKR. Progress for KPI Key Result is automatically updated through a batch program based on the selected KPI.
Information: For KPI Key Result
- Frequency is defaulted to daily as the progress is updated automatically