Create OKR
HUB
OKR
- Create OKR
- OKR without KR
- Create Milestone Key Result
- Create Sobject Key Result
- Sample Sobject
- Sample KPI Filters
- Create Split Target for Key Results
- Create Linked OKR Key Result
- Create Link KR Key Result
- Team Access Only OKRs
- Private OKRs
- Strategic Pillar
- Create KPI Key Result
- Create Report Key Result
- Edit/View OKR
- Add Contributors for Key Results
- Clone OKR
- Clone Key Result
- Close OKR & Add Review Score
- Pause and Unpause OKR
- Save OKR as a Template
- OKR Weights
- Links to OKRs
Board with OKRs
Create OKR from Template
Update Key Result
Hierarchy & Heatmap
KPI
Scorecard
Contest
Recognition
Boards
Funnel
Others
- OKR Reports
- OKRify Dashboards
- Create Teams and Team Members
- Create Periods
- Settings
- Setup Email Notification
- Update Email Template – Key Result Overdue Notifications
- Create New Salesforce Report
- Create new Salesforce Dashboard
- How to search for Tags
- View risk and progress for Objectives and Key Results
- Notifications for Overdue Key Results
- OKR Buttons for Related Objects
- Add an Object as a custom field on OKR
OKRs for Company, Team, or Individual levels can be created in OKRify. Objectives and Key Results can be created on a single screen. OKRs can also be created from an OKR template or can be cloned from existing OKRs. An OKR can be saved in draft status or can be activated immediately.
Prerequisites
Steps to create OKR
1.Click Create OKR Button from Hub
OKRs can also be created quickly from OKR templates or any OKR can also be cloned with a single click.
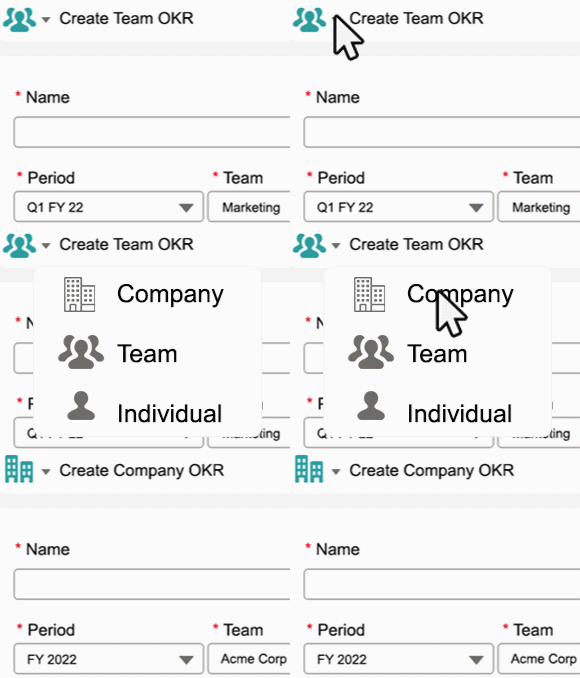
2.Select Ownership for OKR
Choose the ownership level: Company, Team, or Individual for the OKR. Team is the default selection for the ownership.

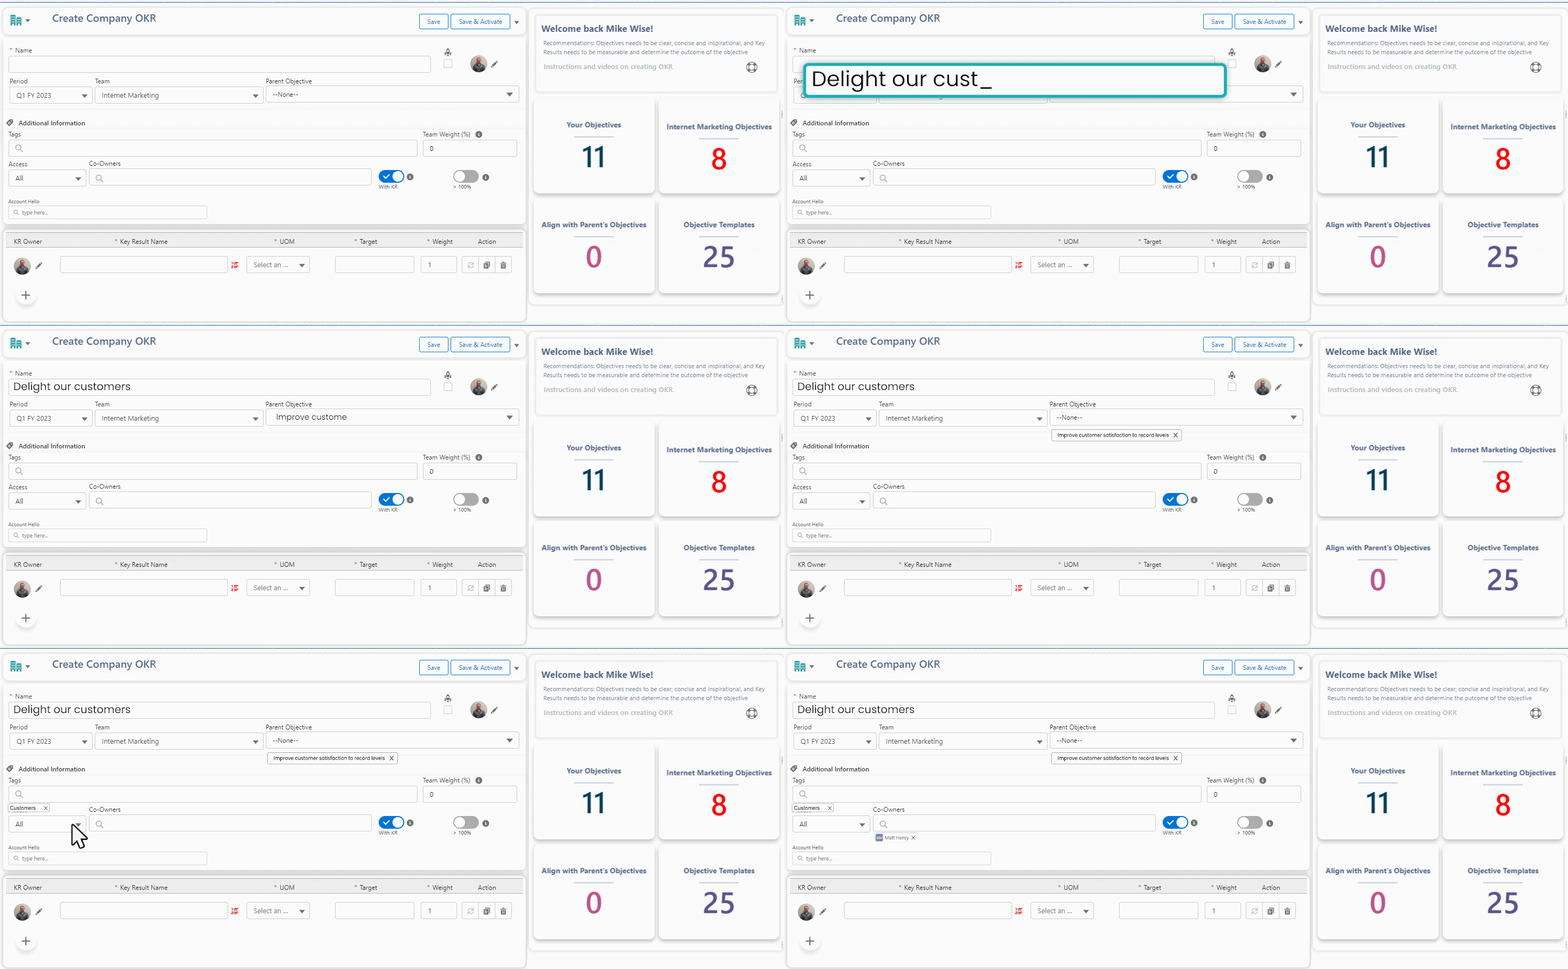
3.Enter Objective Name
Enter a clear, concise Objective name that is inspirational and easy to understand.

4.Select Period
Period automatically defaults to Current Period or Current FY based on the organization’s default settings for Company OKR and Team/Individual OKR. The defaulted period can be changed to any Period in Current Period, Current FY, Future Period, or Future FY status.
5.Select Team
The team field is based on the selected Ownership for the OKR.
- Company OKR – Team automatically defaults to root organization team
- Team OKR – Team automatically defaults to the user’s default team and it can be changed to any field
- Individual OKR – Team field is not required
6.Select a Parent Objective (Optional)
Aligning objectives to strategic goals is a key principle of OKR methodology and helps to ensure focused execution across teams. Entering a parent Objective will align the objective with the parent and also will enable the objective hierarchy view.
7. Add Objective Description (Optional)
If the Objective description field is not available, enable the Objective description field from OKRify Settings - General tab.
Objective description is a long text field that allows users to provide detailed information about their objectives.
8.Add Tags (Optional)
Expand the Additional Information section and enter tags for your Objectives. Tags can be used to group Objectives by Projects, category, focused area, etc. Tags are Salesforce topics that can be easily searched using the global Salesforce search from anywhere in your Salesforce org. Click here for more information on how to search using tags.
9.Enter Team Weight (Optional)
Enter weight for the OKR, weight should be from 0 to 100. Total weight for all the team OKRs should be equal to 100. If Sum of weight is not equal to 100, average progress instead of weights will be used for calculating the progress for the Team. Weight field is only visible if weights for OKR is enabled in the Settings. Please contact your administrator if you want weights enabled for OKR for calculating the progress and risk for teams.
10.Select Access (Optional)
Access field can be used to restrict view access for an OKR. Default value for Access is All which will provide view access for all the OKRify users. Access for OKRs can be restricted based on OKR’s ownership
- For Team OKRs, select Team in Access field to restrict the access only to the team members of the team selected in the OKR and Co-Owners of the OKR.
- For Individual OKRs, select Private in Access field to restrict the access only to the Owner and Co-Owner of the OKR.
11. Add Objective Co-Owners (Optional)
One or more Objective Co-Owners can be added to an OKR, Co-Owners will also have Edit access to an OKR similar to the Owner of the OKR.
Additional fields can be included in the Create OKR page for Objectives and Key Results. Click here for more information on how to add custom fields.
12.Disable Key Result (Optional)
Click the toggle button to disable Key Result. Key Result will be disabled immediately on the screen. Progress for OKRs without KRs are automatically updated based on the average progress of the child OKRs with the OKR without KRs.
An Auto Update KR is created in the background for updating progress from the child OKRs.
13.Enable Objective Progress > 100%
The default behavior is to display an Objective's progress as 100% if it exceeds that value, and only 100% is taken into account when calculating the team's progress. To show the actual progress of the Objective and include it in the team's progress calculation, you can select the "Enable Objective Progress > 100%" field. This will allow the display of the actual Objective's progress and utilize it in the calculation of the team's overall progress.
Add Key Results
Key Results help to measure the outcome of the Objectives. Add one or more key results to measure and track the progress of the Objective. OKR framework recommends 3 to 5 Key results for an Objective. OKRify has 7 types of Key Results to help track any type of Objective you want to track.

1.Enter Key Result Name
Key Result names should be short, concise, and highly recommended to include measurable values. The icon next to the Key Result Name field will be red if the Key Result name field does not have a numeric value. This is not an error, it is to guide users to enter Key Results names with measurable values.
2.Select Unit
Please select the appropriate unit based on your needs,
- Number: Track metrics such as the Number of office locations opened
- Percent: Track by a percentage such as the progress of a project, % Increase in Sales
- Milestone: Track tasks and milestones with deadline dates
- Sobject: Track metrics autoamtically based on Salesforce data such as Lead count, Closed Opportunity Amount, etc.
- Report: Similar to Sobject, Key Result progress tracked automatically with a Salesforce Report
- KPI: Based on KPIs in OKRify such as Average Deal Size, Number of qualified leads.
- Linked OKR: Key Result is based on the progress of other Objectives or Key Results.
For Milestone, Sobject, Report, KPI, and Linked OKR click on the icon next to the Unit field and enter the required details.
3.Enter the target
Target should be greater than the starting value for the Increase Key Result type and Target should be lesser than the starting value for the Decrease Key Result type.
4.Enter Weight
The Key Result’s weight is used to calculate the total progress for the Objective. The sum of weights of all the Key Results should be equal to 100.
Enter the below optional fields for each key result in the side window
5.Select Target Type
The default value is Increase, select Decrease if the expected target should be lower than the starting value.
6.Enter Starting Value
The starting value is optional for Increase Target type Key Result and it should be lower than the target. In the case of Decrease Target type Key Result, starting value is required and should be higher than the target.
7.Select Update Frequency
The frequency in which Key Result progress should be updated. Frequency is automatically defaulted based on the default settings for your organization. We recommend a Weekly Key Result progress update for most Key Results if not all. Update notifications and update score for a Key Result are based on the frequency selected. Frequency is automatically set to Daily for Sobject, Linked OKR, Report and KPI Key Results as these Key Results will be updated automatically.
8.Select Initial Confidence
Select the initial confidence for achieving the key result’s target. Default is based on the default settings of your organization.
9.Enter KR Contributors (Optional)
Enter any additional user/users as contributors for the Key Result. Contributors can also update the Key Result’s progress along with the Owner of the Key Result.
10.Enter KR Deadline (Optional)
Enter a custom deadline for the Key Result if it is different from the end date for the period selected for the OKR. The deadline date should be between the start and end dates of the period selected.
11.Add more key results by clicking the add KR button.
12.Save OKR
Click Save button to save in draft status or click Save & Activate to activate the OKR.
Other actions for Create/Edit OKR
- Save – Save OKR and set the status to draft
- Save & Activate – Save OKR and set the status to activate. For closed OKR, Save & Activate will reactivate the OKR.
- Clone – Clone creates a new OKR in a new tab
- Pause – Set the status of OKR to paused. Progress cannot be updated for paused OKR.
- Close – Set the status of OKR to closed. Progress cannot be updated for closed OKR.
- Save as Template – Saves the OKR to the template.
- Delete – Deletes the OKR permanently
- Create New OKR – Opens a new OKR page